Kitchenaid Fool-Proof Sourdough
Let's be honest….making sourdough is a nightmare! It’s a really long, laborious process and after all that time, love and effort you are more often than not rewarded with a dense, heavy, gummy loaf that is only barely edible as toast!You may be one of the lucky or gifted few that get a beautifully light, puffy loaf on your first attempt, but believe me, I wasn't. However, I didn’t give up and now I can knock out a loaf of sourdough that is light and tasty, with a crisp crust and a fairly open crumb, probably nine times out of ten (nothing can be said to be certain…). I’ve tried to cut out all the ambiguity from the process, so you are not stumped by things like, ‘mix to 75% of full gluten development’, or ‘bulk ferment to a 30-50% increase in the volume’, or ‘add extra turn sets if you feel the dough needs it’ or terms like stitching, sinching, slap & fold, Rubaud Method, cold proofing….the list goes on! My aim is really to help out the struggling sourdough baker and at least get them on the path to fantastic bread. Think of this as a base, a grounding, somewhere you can start your sourdough journey without the pain and disappointment of throwing away endless flat dense bricks…I mean loaves! So good luck and Happy Baking!
Servings: 2 Loaves
Ingredients
Day 1
- 100 g Sourdough Starter
- 150 g Strong White Bread Flour
- 50 g Rye Flour
- 200 g Water
Day 2
- 400 g Sourdough Starter maintain the remaining amount as your starter for next time
- 950 g Strong White Bread Flour
- 50 g Rye Flour
- 22 g Salt
- 550 g Water
- Flour/Rice Flour for dusting
Instructions
Day 1
- Leave this overnight at room temperature (8 to 12 hours).
- By the morning it should have at least doubled in size or preferably tripled. If it hasn’t, don’t continue with the recipe! Give the starter another feed that evening and hopefully by the following morning it will be active enough.
Day 2
- In a KitchenAid mixer or large bowl mix your flours and the water until they come together into a shaggy lump. We like to use precise weight values so we use the Kitchenaid Sifter Scale. You don’t need to go crazy with the mixing, just enough so there isn’t any loose flour at the bottom of the bowl. Let this mixture rest between 30 minutes to 4 hours. This stage is called the autolyze. During this time the flour will fully absorb the water, activating the enzymes in it, which will begin the processes of converting starch into sugars for the yeast to feed on and gluten development.
- Add 400g of sourdough starter to the ‘dough’ and mix it in on a low speed for 3 minutes. This should be enough time for the leaven to be fully incorporated. Again, let this mixture rest, this time for 30 minutes.
- Add 22g of salt and mix on a low speed for 3 minutes. Now leave your dough to ferment for 4 hours, performing stretch and folds every 30 minutes for the first 3 hours.
- Each set of stretch and folds consists of pulling one side of the dough up from the bowl and folding it onto itself in the middle. Then turn the bowl 90 degrees and repeat 3 more times, turning the bowl each time to complete a full circle. Once you have done this every 30 minutes for 3 hours (6 sets), leave the dough to bulk ferment undisturbed for the final hour.
- By the end of this bulk fermentation you should notice the dough has grown significantly, has a domed surface with a few bubbles appearing on it and is still holding a little of its shape from the last set of stretch and folds. If the dough hasn’t grown much, perform an extra set of stretch and folds and then leave it for a further 1 to 2 hours.
- Now it’s time to divide and pre-shape the dough. Very lightly dust a smooth work surface with flour and turn out your dough being careful not to tear it or deflate it too much. Use a dough scraper or a large knife to divide your dough into two equal pieces. Using the scraper or your hands, gently coax each lump of dough into ball, trying to create some tension across the top of it. Imagine a droplet of water on a leaf, its shape is held by surface tension, which is what you are trying to achieve with your dough. Once shaped, cover loosely with a tea towel and leave them for 30 minutes. This is called the bench rest; it allows the dough to relax after you have worked it and settle into its new shape.
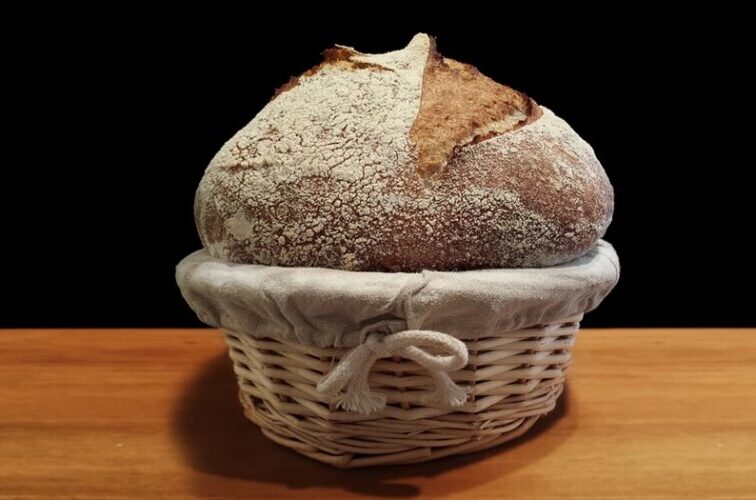
- You now need to shape your loaves. As with the pre-shape, you want to be careful not to degas the dough too much, but you do want to build up some tension to ensure your final loaf has a good shape and springs well in the oven. Dust your work surface with a little flour and flip one ball of dough onto it so the smooth top is now down on the work surface and the sticky side is facing up. Hold the dough by its sides and gently stretch it outwards, now fold one side up and over onto itself, followed by the other side so they overlap each other in the middle. Next take the top of the dough (the side furthest from you) and gently pull it out and up, then fold it down on itself, about 2/3 of the way down the dough. Now continue to roll the dough from the top like a Swiss roll. Use your thumbs to push the dough into itself in the centre, creating tension as you roll, you should end up with a cylindrical shape that is smooth and taut across the top. Dust each loaf and the bannetons with flour, then place your two loaves seam side up in them, cover with a tea towel and leave to proof for 30 minutes.
- Pre-heat your oven to 240c with a Dutch Oven or stock pot in it. When you are ready to bake, remove the pot from the oven and transfer your proofed loaf into it, being very careful not to burn yourself! I like to sit the dough on a piece of baking parchment to ensure it doesn’t stick. Slash the top of the loaf with a pattern of your choice, put the lid on and then return to the oven and bake for 23 minutes. After this time, remove the lid and turn the oven down to 200c, then continue to cook for a further 23 minutes.
- Once cooked, transfer the loaf to a wire rack to cool before slicing. Cook the second loaf.
Video
Notes
Letting your loaves chill in the refrigerator will make them sourer. This can be done for up to 5 days!